I must start this entry by explaining that I'm a little too "plugged-in" these days. That's just one of the inevitables that happen when you work on a computer much of the day and you have a smart phone. It's just so easy to pop out your phone, check Facebook, your email, the stock market... As my interests have recently swayed to the more domestic types, I've discovered a few favorite vendors and signed up for a few daily deal emails. (Not to mention I really need to cancel a ton of emails I started receiving after doing my Christmas shopping online...)
The two sites I'm on most often came about in my hunt for cloth diaper deals. The majority of my diaper stash is the standard inexpensive prefold, but I did try and expand my horizons to fitteds, pockets, and AIOs (all-in-ones). Some of the fun of cloth diapering is finding new and exciting products and fun styles. Without these sites there are a number of brands I would have never heard of. However, these diapers can really get pricey, sometimes upwards of $20 to $30 each! That's why I wait for them to be on sale.
I mentioned one site in my previous post about Thred Up. That's EcoBabyBuys. The products offered on their site are geared towards the eco-concious crowd. When you sign up you get a daily email. I'd say diapers are offered once every couple weeks or so.
The other site I use for the same purpose is Baby Half Off. There is no email, so I'd have to remember to go onto the site every morning to check out the scoop. However, I did find them on Facebook and they post the deal info there so you can find out indirectly as well if you forget to visit the actual site. I've used this site for clothing and shoes as well as diapers. Again, the diaper offerings don't come around that often, but when there one they go fast!

Monday, January 31, 2011
Saturday, January 29, 2011
Rag Quilting...
My current favorite hobby is sewing. I must say it started with quilting, but it really has expanded into new territory lately. In addition, I've never made the same quilt twice. I've definitely enjoyed some patterns more than others, and my most recent quilt is in the former category.
 A friend of mine's baby came a little early, so I needed to get something put together fast. I happened to be at my mother in-law's house (I have two mothers who are quilting inspirations) at the time I found out the baby was born. She had mentioned earlier that evening that her rag quilt was really simple and quick to make. I asked her if she had the pattern and she also gave me scraps of flannel she had from previous quilts. The Rag Time Quilt looks best when it is a combination of many patterns of flannel. Over the course of a few days I visited the quilt shop near work and the quilt shop near home to stock up.
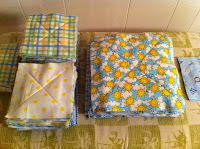 Essentially this quilt is easier because you don't have to do any quilting or binding. But, there sure is a lot of cutting and assembly! First you make quilt sandwiches, which are the top fabric, an inner fabric called batting, and the back fabric. For this pattern you need two sizes of sandwiches. Then you take 4 of the small sandwiches and assemble them to end up about the same size as your big sandwiches. All stay intact by sewing an X across the fabric.
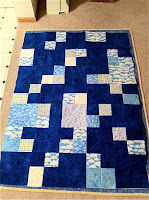 Then you sew the two types of larger squares together in an alternating fashion. Once you sew two pieces together (wrong sides together which is backwards compared to the normal way you sew blocks together) you press the seams open. The seams then peek out of the front of the quilt and the back starts to look like one solid piece. I was slightly limited by the amount of fabric I had, but I tried to make the back of the quilt be mostly dark blue with cloud like patterns mixed in. The dark blue peeks out into the front and looks really cool once the quilt is finished.
 I must add that this pattern requires a walking foot. I typically use the Nelco sewing machine my mother in-law gave me a few years ago for all my projects. But this old work horse does not have a walking foot, so I had to borrow the more modern Husqvarna machine from my mom.
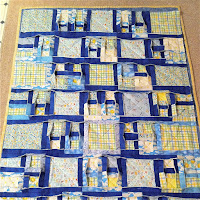
 After the pieces are assembled and the seams are all pressed open, you then take fabric scissors and cut slits as close to the seams as possible about every 3/4" or so. This is what gives the quilt the rag look. Then you wash and dry the quilt as many times as you'd like until the quilt looks like you want it to. Unfortunately, I did not take a picture of the actual finished project, but I might try to snag a peek the next time I visit my friend and her baby.
 A friend of mine's baby came a little early, so I needed to get something put together fast. I happened to be at my mother in-law's house (I have two mothers who are quilting inspirations) at the time I found out the baby was born. She had mentioned earlier that evening that her rag quilt was really simple and quick to make. I asked her if she had the pattern and she also gave me scraps of flannel she had from previous quilts. The Rag Time Quilt looks best when it is a combination of many patterns of flannel. Over the course of a few days I visited the quilt shop near work and the quilt shop near home to stock up.
 Essentially this quilt is easier because you don't have to do any quilting or binding. But, there sure is a lot of cutting and assembly! First you make quilt sandwiches, which are the top fabric, an inner fabric called batting, and the back fabric. For this pattern you need two sizes of sandwiches. Then you take 4 of the small sandwiches and assemble them to end up about the same size as your big sandwiches. All stay intact by sewing an X across the fabric.
  Then you sew the two types of larger squares together in an alternating fashion. Once you sew two pieces together (wrong sides together which is backwards compared to the normal way you sew blocks together) you press the seams open. The seams then peek out of the front of the quilt and the back starts to look like one solid piece. I was slightly limited by the amount of fabric I had, but I tried to make the back of the quilt be mostly dark blue with cloud like patterns mixed in. The dark blue peeks out into the front and looks really cool once the quilt is finished.
 I must add that this pattern requires a walking foot. I typically use the Nelco sewing machine my mother in-law gave me a few years ago for all my projects. But this old work horse does not have a walking foot, so I had to borrow the more modern Husqvarna machine from my mom.
Friday, January 28, 2011
Laundering...
Last night was diaper washing night in our household, so I thought it would be a nice opportunity to share with you what this process entails.
 The second most important step to washing diapers is avoiding detergent build-up. If I still see suds in the window of the machine after the last extra rinse, an additional rinse may be required. But, rinsing thoroughly isn't enough to avoid build-up. You really need to start with the right detergent. Not just any detergent will work, and, contrary to popular belief, just because a detergent is called "free and clear" does not mean it should be used for diapers. For detergent comparisons, look here. The thought of having a separate detergent for diapers vs our regular laundry seemed ludicrous. We went with Charlie's Soap laundry liquid. What I will say is that we used to use a popular free and clear liquid. We started to notice a musty odor coming from the machine after a while. You need to open the detergent drawer and the washer door to let moisture dry, which we assumed contributed to the odor. In fact, in about a month after we switched to Charlie's the odor has completely disappeared. There was obvious build up in the machine from the previous detergent, while Charlie's rinses completely clean.
Of course to start with you need to own your own diapers to wash, and I'll go into details about my favorite and not so favorite brands in future posts. What you should know is you need enough diapers to last you through 2 to 3 days of wear. You should wash diapers every 3 days, but if this slips a day occasionally it's not the end of the world. Since our son is a toddler, he uses far less diapers than an infant would. We wash 15-20 diapers in each load every 2 to 3 days.
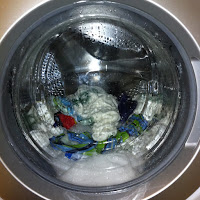
The type of washing machine you own plays a huge roll in your washing routine. We have a front-loading high-efficiency washing machine which is great for saving water and energy, but not so great for washing diapers. You see, the most important step of washing diapers comes in the beginning of the process, which requires plenty of water. We started out just using the "extra water" feature on the washer, but we still had issues with ammonia build up.
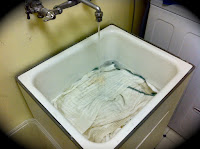 The solution it seemed was to soak the diapers in our utility sink for 30 minutes or so in cold water. Every few washes I add an oxygen bleach to this pre-soak, which requires some time before it can have any effect. If you have a top loading regular machine, a presoak in the machine before starting your wash cycle would be sufficient.
 The solution it seemed was to soak the diapers in our utility sink for 30 minutes or so in cold water. Every few washes I add an oxygen bleach to this pre-soak, which requires some time before it can have any effect. If you have a top loading regular machine, a presoak in the machine before starting your wash cycle would be sufficient.
 After this we wring out the diapers and toss them into the wash. We have an assortment of diaper covers as well and those just get tossed in along with our wetbag and pail liner. Everything can be handled the same way. The pre-soak does add to the usual process, but after that I try to keep everything else as simple as possible.
Next is one additional cold pre-rinse cycle in the machine. Again I tell the machine to use extra water. If you're concerned that there isn't enough water being used, you can always trick the machine by adding a pitcher of water on top of the diapers to make them heavier, or by adding a soaking spare towel. I use the toughest setting for this rinse, the mode for towels.
Next is the actual wash cycle. We use a hot wash cold rinse. We again select extra water and add an extra rinse to the end of the cycle.
 The second most important step to washing diapers is avoiding detergent build-up. If I still see suds in the window of the machine after the last extra rinse, an additional rinse may be required. But, rinsing thoroughly isn't enough to avoid build-up. You really need to start with the right detergent. Not just any detergent will work, and, contrary to popular belief, just because a detergent is called "free and clear" does not mean it should be used for diapers. For detergent comparisons, look here. The thought of having a separate detergent for diapers vs our regular laundry seemed ludicrous. We went with Charlie's Soap laundry liquid. What I will say is that we used to use a popular free and clear liquid. We started to notice a musty odor coming from the machine after a while. You need to open the detergent drawer and the washer door to let moisture dry, which we assumed contributed to the odor. In fact, in about a month after we switched to Charlie's the odor has completely disappeared. There was obvious build up in the machine from the previous detergent, while Charlie's rinses completely clean.
 But back to the routine, I use about half the manufacturer's recommended detergent. With the extra rinse, this can take upwards of an hour and a half to finish the cycle. Then I typically just throw everything but the covers and wetbags in the dryer.
 I also have a clothesline in the backyard. The wash day has to correspond with a weekend day where I have the time to hang dry, so this doesn't happen very often. Hanging diapers in the sun to dry can help sanitize and remove stains. While I'm not freaked out by diaper stains (have you seen what goes through diapers?) it is nice to give them a little freshen up every now and then. However, even with a drip dry I will still toss them in the regular dryer for a few minutes to give them some softness. Hang drying can make things a little crispy!
While I'm sure that this is more than you ever wanted to know about washing diapers, there are many ways to customize the process. In my opinion that's what makes it so fun! That and the adorable diapering options there are. Here are some links to my favorite diapering sites and their washing advice:
http://www.thirstiesbaby.com/care.php
http://www.bummis.com/ca/en/washing-cloth-diapers.php
http://www.diaperjungle.com/washing-cloth-diapers.html
Thursday, January 27, 2011
Swapping...
I've recently begun a journey in the world of clothing swaps. Through one of my favorite daily deal websites (ecobabybuys.com), I found out about ThredUp. EBB was offering half off their PRO membership, $20 for one year. Turns out you don't need to pay anything to participate in the swap, but I figured I'd go all in and see what the full experience would entail.
In addition to the membership, the deal gave me the chance to order one box for free. Each box is $5 plus you pay shipping (approx. $10.95). You choose the age group, and the type of items you're looking for and you can browse what seemed like hundreds of boxes. I ultimately chose a box of girl clothing, 3-6 month sizes, of mixed tops and bottoms. The website itself does not show pictures of the items, and only in a few cases did the "senders" include links to web albums where you could see the actual items. I basically ordered this box sight unseen. It took a day or so for the "sender" to acknowledge my order and then perhaps another day for the shipping to be arranged. I was so excited while I waited for it to arrive.
The general process is that ThredUp never handles the actual shipments themselves. They handle the shipping logistics, but all postings, shipments, and reviews are handled by the users of the service themselves. You are sent 10 USPS flat rate boxes to help you send out shipments (they want all boxes to be of standard size). I'm still waiting for mine to arrive, however, you can also just go to the Post Office and pick up boxes yourself. Since I ship things out so rarely, I didn't realize that picking up a flat rate box is free! Anyway, you fill your box (which I'll have to post about separately since I haven't done this part yet) and you post it to the website. Once someone chooses your box you are notified. You then accept the order and are emailed the shipping label and instructions from ThredUp. Then you just leave the box on your doorstep for pick-up.
As a recipient you are required to review the box. You answer a brief questionnaire ranking the quality and the style of the items you received. This feedback is added to the sender's profile where other potential shoppers can access historical shipment information. There are also rankings and awards to be earned for being a good sender. You can keep tabs of your favorite senders as well so you can keep your eye out for their future boxes.
I received my box and was so excited to tear into it! Again, I didn't know what was inside since I went completely off the descriptions. In all there were 16 items, including a pink robe (the main reason I chose this box in the first place).
 Essentially I paid $1 per item of clothing I received. There were only one or two items that I plan to pass on (and probably donate, but perhaps stock up for a future box of my own) so it turned out to be a tremendous deal!
I'll add another post when I finally get around to sending out my first set of boxes. I feel a lot of pressure to have a good box cause I want a good rating too, and I just gave a bunch of newborn boy clothing to my sister for her little one due in April. I didn't know about the swap until I'd already given a lot of our items away, but I still want her to have first choice.
In addition to the membership, the deal gave me the chance to order one box for free. Each box is $5 plus you pay shipping (approx. $10.95). You choose the age group, and the type of items you're looking for and you can browse what seemed like hundreds of boxes. I ultimately chose a box of girl clothing, 3-6 month sizes, of mixed tops and bottoms. The website itself does not show pictures of the items, and only in a few cases did the "senders" include links to web albums where you could see the actual items. I basically ordered this box sight unseen. It took a day or so for the "sender" to acknowledge my order and then perhaps another day for the shipping to be arranged. I was so excited while I waited for it to arrive.
The general process is that ThredUp never handles the actual shipments themselves. They handle the shipping logistics, but all postings, shipments, and reviews are handled by the users of the service themselves. You are sent 10 USPS flat rate boxes to help you send out shipments (they want all boxes to be of standard size). I'm still waiting for mine to arrive, however, you can also just go to the Post Office and pick up boxes yourself. Since I ship things out so rarely, I didn't realize that picking up a flat rate box is free! Anyway, you fill your box (which I'll have to post about separately since I haven't done this part yet) and you post it to the website. Once someone chooses your box you are notified. You then accept the order and are emailed the shipping label and instructions from ThredUp. Then you just leave the box on your doorstep for pick-up.
As a recipient you are required to review the box. You answer a brief questionnaire ranking the quality and the style of the items you received. This feedback is added to the sender's profile where other potential shoppers can access historical shipment information. There are also rankings and awards to be earned for being a good sender. You can keep tabs of your favorite senders as well so you can keep your eye out for their future boxes.
I received my box and was so excited to tear into it! Again, I didn't know what was inside since I went completely off the descriptions. In all there were 16 items, including a pink robe (the main reason I chose this box in the first place).

I'll add another post when I finally get around to sending out my first set of boxes. I feel a lot of pressure to have a good box cause I want a good rating too, and I just gave a bunch of newborn boy clothing to my sister for her little one due in April. I didn't know about the swap until I'd already given a lot of our items away, but I still want her to have first choice.
Introducing...
I'm excited to start a blog, although in all honesty I don't anticipate a large number of followers. My main motivation came from a spark of interest my Facebook friends showed in my latest adventure, a clothing swap. I wanted a place to share info about my other favorite motherhood discoveries. With my maternity leave very close on the horizon I figured now was a great time to get started.
To tell you a little bit more about myself and what you can expect from this blog:
I'm a realist with Eco-friendly ambitions. I advocate breastfeeding, baby-food making, cloth diapering, and dabble in some of the more "crunchy" parental activities out there. But, at the same time I allow the occasional Thomas the Tank Engine movie and Oreo cookie in my kid's world. Sometimes you gotta do what you gotta do.
Subscribe to:
Posts (Atom)