My current favorite hobby is sewing. I must say it started with quilting, but it really has expanded into new territory lately. In addition, I've never made the same quilt twice. I've definitely enjoyed some patterns more than others, and my most recent quilt is in the former category.

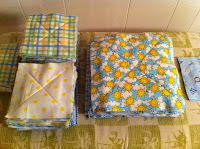
A friend of mine's baby came a little early, so I needed to get something put together fast. I happened to be at my mother in-law's house (I have two mothers who are quilting inspirations) at the time I found out the baby was born. She had mentioned earlier that evening that her rag quilt was really simple and quick to make. I asked her if she had the pattern and she also gave me scraps of flannel she had from previous quilts. The
Rag Time Quilt looks best when it is a combination of many patterns of flannel. Over the course of a few days I visited the
quilt shop near work and the
quilt shop near home to stock up.
Essentially this quilt is easier because you don't have to do any
quilting or
binding. But, there sure is a lot of cutting and assembly! First you make quilt sandwiches, which are the top fabric, an inner fabric called batting, and the back fabric. For this pattern you need two sizes of sandwiches. Then you take 4 of the small sandwiches and assemble them to end up about the same size as your big sandwiches. All stay intact by sewing an X across the fabric.
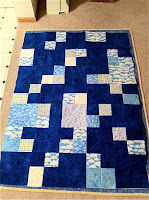
Then you sew the two types of larger squares together in an alternating fashion. Once you sew two pieces together (wrong sides together which is backwards compared to the normal way you sew blocks together) you press the seams open. The seams then peek out of the front of the quilt and the back starts to look like one solid piece. I was slightly limited by the amount of fabric I had, but I tried to make the back of the quilt be mostly dark blue with cloud like patterns mixed in. The dark blue peeks out into the front and looks really cool once the quilt is finished.
I must add that this pattern requires a walking foot. I typically use the Nelco sewing machine my mother in-law gave me a few years ago for all my projects. But this old work horse does not have a walking foot, so I had to borrow the more modern Husqvarna machine from my mom.
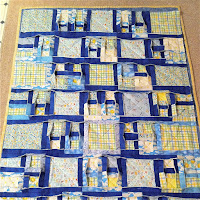
After the pieces are assembled and the seams are all pressed open, you then take fabric scissors and cut slits as close to the seams as possible about every 3/4" or so. This is what gives the quilt the rag look. Then you wash and dry the quilt as many times as you'd like until the quilt looks like you want it to. Unfortunately, I did not take a picture of the actual finished project, but I might try to snag a peek the next time I visit my friend and her baby.

 A friend of mine's baby came a little early, so I needed to get something put together fast. I happened to be at my mother in-law's house (I have two mothers who are quilting inspirations) at the time I found out the baby was born. She had mentioned earlier that evening that her rag quilt was really simple and quick to make. I asked her if she had the pattern and she also gave me scraps of flannel she had from previous quilts. The Rag Time Quilt looks best when it is a combination of many patterns of flannel. Over the course of a few days I visited the quilt shop near work and the quilt shop near home to stock up.
 Essentially this quilt is easier because you don't have to do any quilting or binding. But, there sure is a lot of cutting and assembly! First you make quilt sandwiches, which are the top fabric, an inner fabric called batting, and the back fabric. For this pattern you need two sizes of sandwiches. Then you take 4 of the small sandwiches and assemble them to end up about the same size as your big sandwiches. All stay intact by sewing an X across the fabric.
  Then you sew the two types of larger squares together in an alternating fashion. Once you sew two pieces together (wrong sides together which is backwards compared to the normal way you sew blocks together) you press the seams open. The seams then peek out of the front of the quilt and the back starts to look like one solid piece. I was slightly limited by the amount of fabric I had, but I tried to make the back of the quilt be mostly dark blue with cloud like patterns mixed in. The dark blue peeks out into the front and looks really cool once the quilt is finished.
 I must add that this pattern requires a walking foot. I typically use the Nelco sewing machine my mother in-law gave me a few years ago for all my projects. But this old work horse does not have a walking foot, so I had to borrow the more modern Husqvarna machine from my mom.
No comments:
Post a Comment