I gave birth to my son two days after my due date. My due date for baby #2 is tomorrow. I did not think there was a chance I'd still be pregnant at this point, but there you have it. My babies like to bake fully I suppose.
The point of this entry is to inform other expecting mothers to be skeptical of any natural inducing methods you might hear or read about. I've tried everything except ingesting anything outside of normal nutrition and I have not experienced any sort of effect.
I have no plan to be induced, nor do I want any other interventions like having my membranes stripped or anything like that. I plan to let the baby come when she's ready. That said, I'm ready, where is she?!?
I've tried spicy food. Activity wise, sex has had little to no effect. I've tried stimulating some pressure points I read about, and that didn't bring on one single contraction. I am walking every day about 30 minutes. I just read an article saying I should probably do more. I did however add curb walking to the routine. I can say today I feel like the baby might be lower, but is that from the walking or just because that's the natural progression of things? Who can tell. I'm also following advice I heard from my sister in-law to rock in a rocking chair. I feel like I have to keep something up or else it's like I'm not trying hard enough to have this baby, but I've all but lost faith that we really have much impact on when labor starts. I think it's up to this kid. Hopefully she wants to meet the world soon, cause we sure want to meet her!

Monday, March 14, 2011
Friday, March 11, 2011
Pooping...
When it comes to cloth diapering, poop is probably the biggest fear and hurdle many parents face. As I'd mentioned before, when we had a service we never really dealt with poop. Sure we wiped our son's bottom, but that was the extent of it. Leave it to the service to take care of...
 The other 20% of the time for us is typically when we don't have a liner in, or the liner has shifted and isn't really giving the proper coverage inside the diaper. Today for example, I changed a poopy diaper and then did not put a liner in the next diaper, figuring that was his nap diaper and it would only be pee. I was wrong, I got to change two bombs in a row. I didn't freak out though, I have a diaper sprayer! This sprayer attaches to the plumbing at the back of the toilet. We don't have ours nicely rigged to the wall or anything, it sits around the bottom of the toilet out of the way. The water pressure is relatively good, and with a little patience you can spray the remaining poop particles off the diaper without getting your hands dirty. Having a pail in the bathroom close by would be a good idea. For now I have to ring out a bit of the water and walk the diaper to the laundry room. You should wash your hands after changing a diaper anyway, so it doesn't phase me too much.
Now we don't have that luxury anymore. It has to be dealt with in one way or another... There are two products we use that really reduce the grossness of handling a poopy diaper. The goal behind using these items is to reduce the amount of actual poop touching that might occur. Trust me, I know it's different when it's your own kid's poop, but I still find it pretty disgusting.
Even back in the day when our parents were cloth diapering, the first step to cleaning a poop diaper is to shake as much of the poop itself into the toilet. With toddler poop that can sometimes be all it takes, but it's not a guarentee. One way to assist the clean break between poop and diaper is a flushable liner. We use GroVia BioLiners. I chose this product because it seemed a bit wider than the other liners that were available at our diapering store. I simply lay the liner on the top of the diaper before putting it on our son. It's a little tricky with a prefold using my standing up technique, but when it's in the diaper the right way it can be a real life saver! In our experience this alleviates 80% of the poop handling you might have to do.
 The other 20% of the time for us is typically when we don't have a liner in, or the liner has shifted and isn't really giving the proper coverage inside the diaper. Today for example, I changed a poopy diaper and then did not put a liner in the next diaper, figuring that was his nap diaper and it would only be pee. I was wrong, I got to change two bombs in a row. I didn't freak out though, I have a diaper sprayer! This sprayer attaches to the plumbing at the back of the toilet. We don't have ours nicely rigged to the wall or anything, it sits around the bottom of the toilet out of the way. The water pressure is relatively good, and with a little patience you can spray the remaining poop particles off the diaper without getting your hands dirty. Having a pail in the bathroom close by would be a good idea. For now I have to ring out a bit of the water and walk the diaper to the laundry room. You should wash your hands after changing a diaper anyway, so it doesn't phase me too much.
I've read that breastfed newborn poop is water soluble and doesn't require rinsing. I'm still a bit skeptical as I don't want to put poop straight in the washing machine. At least with the presoak step in my washing routine I could probably deal with the newborn poop in the utility sink first. Toddler poop on the other hand needs to be removed as much as possible before washing, so I'm glad I use liners and a sprayer or I wouldn't know what to do!
Tuesday, March 8, 2011
Dirty Diaper Storing...
How we store our dirty diapers between washings does seem to go against logic, but that's because most diaper pails are designed in such a way that they lock in the odors and don't let them escape. It turns out, with cloth diapers anyway, if you leave them in an open pail exposed to the air they smell far less. Some could argue you can't smell our pail at all (unless of course you put your nose physically on the diaper I'd imagine).
I was skeptical at first. When we had the diaper service we were incredibly lazy with our diapers. It mortified my mother to hear that we wouldn't even shake out the poo before putting it in the pail. We have a Graco Touch Free diaper pail which appears to be unavailable today... The concept was you could wave your hand near the pail and the lid would open and you'd put the diaper in and the lid would close. The design of the depository area was such that it didn't allow much air to escape from the bag where the diapers ended up. It was magical in theory, but didn't really work well for cloth. The diapers just fit in the depository and the lid didn't always automatically lift as expected. We started to just lift manually, which worked OK anyway. Since a cloth diaper took up more space in the pail, we were changing the bag more often then one would if they were using disposables. I will say the odor protection seemed to work fabulously however. I just feel awful for the service delivery guy who had to pick up our stinky bags every week, ewe!
When we moved to home laundering our habits had to change and we had to shake and rinse off poop because we weren't washing every day and the dirty diapers were to be stored inside (we did keep them in the garage for a bit, but that was such a pain).
 The solution I found was actually this rolling pet food container from The Container Store. I excluded the lid, but kept it around in case this open air theory didn't pan out and I wanted to keep in the smells (the lid is now thrown away). I thought having the wheels would make it easier to transport outside or to move the pail out of the way in the laundry room if needed. Then I got a Planet Wise pail liner. Theoretically you could use this liner even if you used disposables. It helps cut down on the use of plastic trash bags. This bag was the right size for the container I had chosen, and I liked that it came in a large variety of colors. I chose purple because at the time if was the first color my son could say, and it seemed to be his favorite. The volume of the container and the liner are plenty for the 3 day wash cycle we use. There's plenty of room, even when we start to diaper two kids.
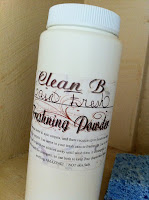 I wash the pail liner with the diapers every other wash or so. It hang dries while the diapers dry. If I feel like the pail could smell a little fresher between washes, I sprinkle some Clean B pail refresher on top of the diapers. This is completely unnecessary, but I got the powder at the same time I bought the wipe solution because it sounded like a fun thing to try. I can honestly say, if you make sure there's no actual poop on the diapers in the pail, there is no odor when you use this method.
I was skeptical at first. When we had the diaper service we were incredibly lazy with our diapers. It mortified my mother to hear that we wouldn't even shake out the poo before putting it in the pail. We have a Graco Touch Free diaper pail which appears to be unavailable today... The concept was you could wave your hand near the pail and the lid would open and you'd put the diaper in and the lid would close. The design of the depository area was such that it didn't allow much air to escape from the bag where the diapers ended up. It was magical in theory, but didn't really work well for cloth. The diapers just fit in the depository and the lid didn't always automatically lift as expected. We started to just lift manually, which worked OK anyway. Since a cloth diaper took up more space in the pail, we were changing the bag more often then one would if they were using disposables. I will say the odor protection seemed to work fabulously however. I just feel awful for the service delivery guy who had to pick up our stinky bags every week, ewe!
When we moved to home laundering our habits had to change and we had to shake and rinse off poop because we weren't washing every day and the dirty diapers were to be stored inside (we did keep them in the garage for a bit, but that was such a pain).

 I wash the pail liner with the diapers every other wash or so. It hang dries while the diapers dry. If I feel like the pail could smell a little fresher between washes, I sprinkle some Clean B pail refresher on top of the diapers. This is completely unnecessary, but I got the powder at the same time I bought the wipe solution because it sounded like a fun thing to try. I can honestly say, if you make sure there's no actual poop on the diapers in the pail, there is no odor when you use this method.
Monday, March 7, 2011
Recipe - Freeze Ahead Sicilian Casserole
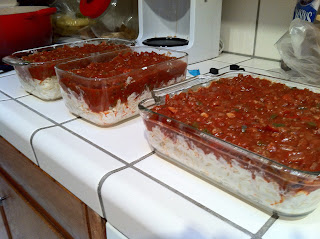
I wanted to share my go-to freeze ahead recipe. Yesterday I wanted to stock the freezer with foods that would be just heat and serve for when the baby arrives. I also just got frozen lasagnas from the supermarket, but this recipe is a little more homemade and my family loves it. I can't take any credit though, I follow a recipe to the T that I found online. For the full recipe, you can find it here (http://busycooks.about.com/od/groundbeefrecipes/r/siciliansupper.htm)
I took the recipe and loosely multiplied everything by one and a half. I found that this actually made more like twice the volume of casserole and I ended up with two glass loaf pans and one 2 quart baking dish worth. The loaf pans are the perfect size for our family of 3 for one meal, we had one last night. It left basically a serving spoon scoop full that I then gave our son for lunch today. The 2 quart baking dish can serve four relatively well.
What I used (again, see original recipe for actual proportions):
1.5 lbs ground beef
1 giant yellow onion, chopped
3 cloves of garlic, minced
2 bell peppers (1 red, 1 green)
1.5 cans (6 oz) tomato paste
1 can (15 oz) tomato sauce
Slightly over 1 cup water
1.5 tsp Italian seasoning
1 package (almost 4 cups) elbow macaroni
1.5 packages (8 oz) cream cheese (full fat, mmm)
Slightly over 1 cup whole milk
About 8 oz (second half of sour cream container after making chicken and rice casserole) sour cream
Parmesan cheese
 I boiled the water and cooked the pasta per the package instructions. Meanwhile, I browned the beef with the onion and garlic. When the beef is almost done, added the bell peppers. I like to use the two colors, even though the recipe calls for green, cause it adds a nice color to the pot. When the beef is browned, drain well, and add the tomato paste, tomato sauce, water, and seasonings and simmer.
 Meanwhile, cube the cream cheese and put it with the milk in a microwave safe bowl. Microwave 3 minutes on medium level (I used Level 6, and we have a weak microwave). Pour the cheese mixture to a large bowl and whisk until smooth. Then add the pasta and the sour cream and about a half cup of parmesan cheese, mix well. If you plan to serve same day, you're golden. If you plan to freeze ahead, add 1 heaping table spoon of cornstarch to the cheese/pasta mix.
Spoon the pasta mixture into the dishes first. Then top with the sauce. Sprinkle more parmesan on top (I actually didn't have enough to do this last part this time, but I can add it to the top when I defrost and reheat). Wrap tightly in foil and bake for 25-35 minutes, remove cover, and bake 10 more minutes or so, until casserole is bubbly.
 To freeze, I put a layer of plastic wrap on first to reduce the amount of air exposure to the casserole. Then it gets wrapped tightly in foil, which can be used when reheating. Take the casserole from the freezer to the fridge one day in advance to defrost. I would suggest baking a bit longer, maybe 45 minutes covered, if the casserole isn't fully defrosted.
I took the recipe and loosely multiplied everything by one and a half. I found that this actually made more like twice the volume of casserole and I ended up with two glass loaf pans and one 2 quart baking dish worth. The loaf pans are the perfect size for our family of 3 for one meal, we had one last night. It left basically a serving spoon scoop full that I then gave our son for lunch today. The 2 quart baking dish can serve four relatively well.
What I used (again, see original recipe for actual proportions):
1 giant yellow onion, chopped
3 cloves of garlic, minced
2 bell peppers (1 red, 1 green)
1.5 cans (6 oz) tomato paste
1 can (15 oz) tomato sauce
Slightly over 1 cup water
1.5 tsp Italian seasoning
1 package (almost 4 cups) elbow macaroni
1.5 packages (8 oz) cream cheese (full fat, mmm)
Slightly over 1 cup whole milk
About 8 oz (second half of sour cream container after making chicken and rice casserole) sour cream
Parmesan cheese
 I boiled the water and cooked the pasta per the package instructions. Meanwhile, I browned the beef with the onion and garlic. When the beef is almost done, added the bell peppers. I like to use the two colors, even though the recipe calls for green, cause it adds a nice color to the pot. When the beef is browned, drain well, and add the tomato paste, tomato sauce, water, and seasonings and simmer.
Spoon the pasta mixture into the dishes first. Then top with the sauce. Sprinkle more parmesan on top (I actually didn't have enough to do this last part this time, but I can add it to the top when I defrost and reheat). Wrap tightly in foil and bake for 25-35 minutes, remove cover, and bake 10 more minutes or so, until casserole is bubbly.
 To freeze, I put a layer of plastic wrap on first to reduce the amount of air exposure to the casserole. Then it gets wrapped tightly in foil, which can be used when reheating. Take the casserole from the freezer to the fridge one day in advance to defrost. I would suggest baking a bit longer, maybe 45 minutes covered, if the casserole isn't fully defrosted.
Sunday, March 6, 2011
Dino Rolling...
 I buckled down and finished Steggie, the pull dino I started in this post. I had sewn 99% of his body, and just needed to add a bit more fluff and then sew closed his tail. Then I sewed on buttons for eyes. He was pretty cute! At this point the rolling stand needed to be constructed. The directions asked for a 5x7 piece of wood, which is the default size for an unfinished wooden plaque you can get at any craft store. I happen to have a wood worker in the family, but this piece was inexpensive and already constructed, so I only asked for his help drilling the holes in the sides for the wheel axels.
 Then the wheels, axels, and plaque needed to be painted. Since the fabric of Steggie's skin was red with brown details I decided to paint the surfaces a chocolate brown. My son even helped with the painting. I used a gloss finish acrylic paint so it would be a bit shiny without requiring a clear top coat.
After everything was dry I put in the wheels and axels and then added an eye screw to the front of the plaque. To this I tied a piece of ribbon. The end by the plaque I hand sewed so it wouldn't slip, and then the other end I added a bead with a knot on either side so the bead would stay put. The ribbon was dark blue with a red thread border and the bead was brown to match the stand.
Lastly I took the other sides to the velcro and glued them in line with where the feet would go. I mentioned in my original post that the velcro pieces were probably too big, and the feet were a bit of a pain to sew. So, the velcro pieces weren't lined up the same and matching them on the stand does look a little off, but oh well, that's how handmade goes sometimes. My advice would be to use smaller pieces next time, perhaps more square in shape. Well, so the glue didn't quite work as well as I'd hoped on the glossy painted surface, so my handyman tapped in tiny nails to hold the velcro down, which was definitely more functional.

Friday, March 4, 2011
Nursery Decorating...
Well I think it's 99% official, the nursery is ready for our little girl to arrive. With my strong nesting urges these days I can't guarantee I won't move something around or reorganize something in the closet, but for the moment I'm pleased with the results.
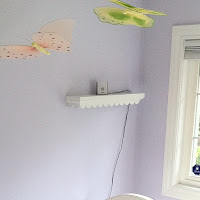 We received these butterflies to hang instead of a mobile at our baby sprinkle last weekend. I'd mentioned before, we received this soother and an adorable stuffed turtle, whose colors fit everything perfectly. I wanted a better way to set up the baby monitor since we just propped it up between the crib and the wall with our son. This could have been a huge safety hazard, so I suppose we're lucky nothing ever happened. The cord is still probably not in it's final resting spot, but at least we can thread it away from the crib itself. I can also put some small light-weight decorations on the shelf in the future. Nothing heavy should be placed up there. There were a few cute items at our baby sprinkle that I should be receiving soon that might work.
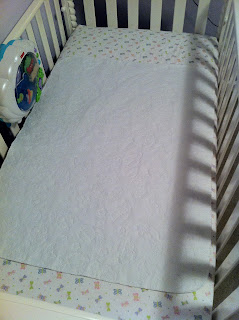 Both our son's crib and the new crib are set up in the same fashion when it comes to bedding. I read somewhere that it's a good idea to put two layers of waterproofing on the mattress. This way, if there is an accident in the middle of the night, you can strip off one layer of sheet/mattress cover and deal with remaking the bed at a more convenient hour. So, both cribs have a fitted mattress pad with a fitted sheet, then a mattress cover that's just a lay down rectangle with a jersey knit sheet on top. I like the feel of the softer sheet, and smaller pad is easier to remove in case it needs to be removed quickly. I purchased this Gerber knit sheet because I liked the hearts, but I must agree with the reviewers on the Babies R Us website. The elastic on the sheet is too small and is much too tight of a fit. It won't be removed easily, so I have it on there for looks I guess, until our first leak or spit-up on it. After that point I have a couple plain white ones that will work just fine. I opted to go without the mesh breathable bumper this time around. Our son slept best swaddled up as tight as possible, so he barely moved during the night. We'll assume our baby girl will be the same, but you never know! One thing I really like about this crib is it has a drawer underneath. It can't hold a lot, but it's perfect because it has two sections. One side I put my spare changing pad covers and the other side I put the swaddling blankets.
 The changing table is the same one from our son's room. I'm not one who cares a lot about my furniture coordinating (as you can probably tell). The baskets underneath are the same too. In each of the four baskets I currently have baby socks and burp cloths on the top shelf, shoes/booties and hats on the bottom shelf. Next to the changing table is a repurposed night stand. The basket on the bottom is filled with cloth diapers, although these will have to wait a while before being used. We are being given 3-6 months of diaper service as a baby gift, and those are always prefolds. Those will go on the top shelf of the changing table. In the drawer of the nightstand are the covers. My mom actually gave me my old nightlight from when I was a kid. It's this adorable mushroom with a butterfly theme painted on it. Lastly, I got myself an Itzbeen timer. I was looking for a small clock to put on the nightstand to keep track of feeding times at night, and I came across this timer. I look forward to reviewing it once I can put it in use, but essentially it helps you keep track of changes, sleeping periods, and time between feedings. There is also a switch at the bottom that helps you keep track of what side you started your last breastfeeding session on. With our son I had a hand written journal type, so this seems much more convenient. The rocking chair is a family heirloom that again we moved from our son's room when we stopped rocking him to sleep before bed. The finishing touches are a lavender baby blanket with butterfly detail, and some wall art we already had lying around that were the right color scheme.
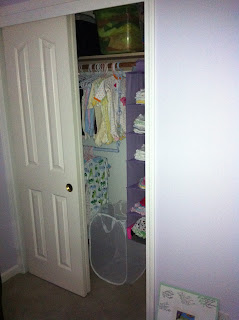 As for closet organization (of course the most exciting part of the nursery I'm sure), I got a cheap pop-out hamper and this cool closet extender. I couldn't believe that with a second child, and only small opportunities to receive gifts, we had entirely filled the closet rung to capacity. Thank goodness baby clothes are short! But, from experience with how many clothes my son accumulated, I knew this was going to be a problem. The extender practically doubled the hanging space! In addition, I had ordered this hanging shelf in lavender a while back since there is no room for an actual dresser in the nursery. I hang most everything as a result, except these shelves allow me to store all my onesies and plain Gerber t-shirts. I also needed two shelves for bloomers of all things. All these adorable dresses and skirts require some sort of diaper covering, something I didn't realize I'd need since I was having a girl, but now I appreciate. The top shelf of the closet is rather deep, and I can stack two plastic storage containers high inside. I've got two full of infant toys, and one with larger hand-me-down items that just don't fit in the hanging space quite yet. I also have my pump and my carriers up there.
The final detail I must mention is the beautiful quilt hanging on the side of the crib. This was handmade by my mother in-law. Her craftsmanship is something to be envied for sure. She let me pick the fabrics and the pattern which meant I got exactly what I wanted. It was her first time doing applique, but you'd never know it. Enjoy these pics of the masterpiece, as well as the rest of the room!


Subscribe to:
Posts (Atom)